 |
|||||||
|
|
|||||||
|
We wander for distraction, but we travel for fulfillment. ~ Hilaire Belloc
Camping, At No Time In the History of My Life, Have I Enjoyed So Much To Be A Wife - Cindy Bonish 12/07
|
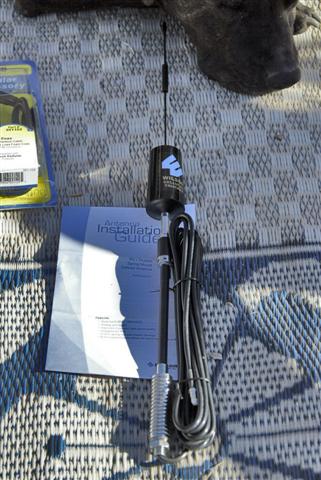
Wilson Electronics Amp and Antenna After too many times where we were camped in a beautiful campground, but just out of reach of a signal for our Broadband connection to lock into a tower, we knew we needed a solution. There is nothing worse than having to leave a beautiful secluded campsite to go find a signal to update the website or to simply make a phone call. The Satellite systems on the market are out of our budget, and from what we've heard, they aren't reliable enough in the various weather conditions we seem to always be following around. For the most part, we've got a good connection where ever we've stayed on the East Coast or in the Mid-West as long as we stayed close to a bigger city, but once we got out West and hit the true wild frontier, the signals seemed few and far between. Doing a bit of research on the internet directed us to Wilson Electronics and their amplifier systems for both cell phones and broadband cards. We figured we'd give them a try to see what they could do for us.
Everything should be able to be hooked up by me, which is just amazing, and hopefully, after talking with the Tech Support over at Wilson, we should be able to run the system from a 12 volt receptacle so we don't need to worry whether we're boondocking or staying in a campground. Being as the Wilson Electronics factory is located in Utah, we had the equipment mailed to us in no time and it all came in one simple box. No multiple boxes to worry about making numerous trips to the post office and everything came packaged nicely with good, detailed instructions. I liked the way each instruction manual listed a phone number if you had any questions. I also like the way everything that was in the package was marked with a Made in the USA stamp. When I did need to call the Tech Support to ask some questions, I spoke to an American operator that answered my multiple questions without asking me for any other info. Except for my recent call to Verizon, I cant remember the last time I called a Customer Service Line and spoke to an American, and one that was able to help me answer my questions within seconds. On to the Install
The
Dual-Band Outside Trucker Antenna
needs to be mounted roughly 20' from the inside antenna and amplifier so it doesn't
create any oscillation between the two devices. Being as we only
have a 25' RV, this was our biggest dilemma. We have a ladder on
the rear, and a luggage rack on the roof which are both perfect to
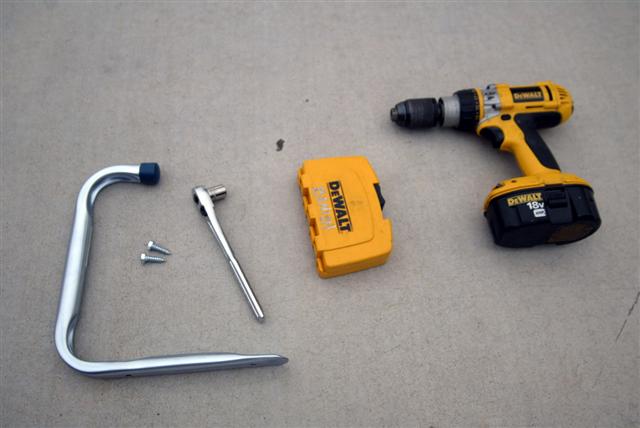
Wilson Electronics had sent me the hardware to mount the Dual-Band Outside Trucker Antenna to my roof top luggage rack, but this would only give me maybe 10' of distance from the inside to the outside antennas. A short trip to the local hardware store and I grabbed an aluminum ladder hanger to mount to the bike rack on the tongue of the RV. (Thank you Cindy for this suggestion!)
This inexpensive hanger ($4) was mounted
to the cross member of the top of the mountain bike rack with two bolts.
I know the picture shows Lag Bolts, but I decided to use longer Bolts
that would go all the way through the 2" square steel for a better hold. I used Nylock nuts to keep them from loosening during road
The arrows point to where the bolts went through the cross bar and the top little hook will be where the Trucker Antenna mounts. Once this was installed, I ran the wiring across the roof top and hid it under our solar panels to keep the cable from flapping under high winds. This is also where I needed to make my decision as to how I was going to run the cable into the camper?
Wilson recommended to run it through a
window opening, but being as we full time, I wanted to keep everything
as hidden as possible. If this was a weekend warrior set-up, then
the window would be fine, but I like my stuff to be neat and
professional looking. For those that want to bring a set up like
this with you, and still be able to use it at home also, you could just
make a small stand for the antenna, and lay the
Dual-Band Amplifier,
along with the Dual-Band
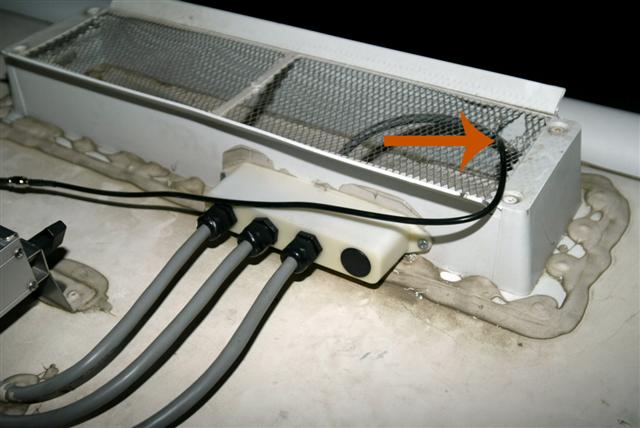
Our 3 solar panels are wired down through the refrigerator vent which allows the wiring to run to the inverter and batteries with no holes being drilled into the roof. (Something I wanted to avoid) In this picture you can see where the cables from the solar panels meet and drop down through the refer vent. The red arrow points to where I made a small hole for the Antenna Cable to drop down. By unscrewing the four screws holding the fridge vent on, I tore a very small hole in the metal screen that protects the hole. With Cindy standing on the bottom of the vent holding a flashlight, I was able to feed her the wire and keep it snug against the wall so it wouldn't rub against the sharp fins of our Norcold refrigerator.
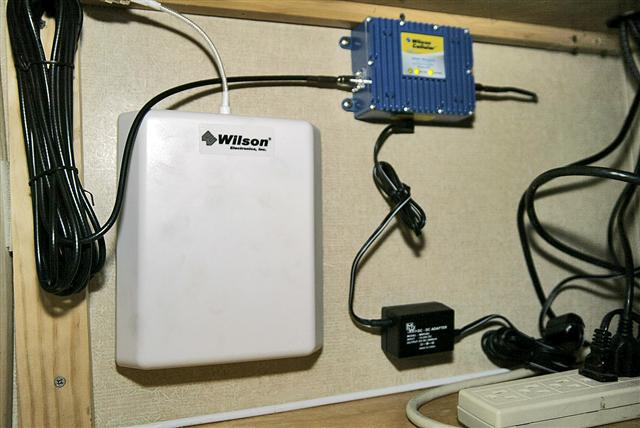
I know this doesn't look pretty, but I'm 50% Polish and it'll have a cover over it so no one will ever see it but me (and anyone who looks at this page). Besides, how can you call a custom install complete if you don't use Duct Tape? I should also mention that I needed to add another 10' of cable to the existing cable that came with the Outside Antenna. The existing cable got me right to the fridge vent, and the next 10' got me right to the amp with about a foot to spare. You'd almost think we planned it that way. Inside the Camper Once I had the wire ran inside the camper, the rest was as simple as could be. There was the Dual-Band Inside Panel Antenna and the small Dual-Band SOHO Amplifier that needed to be mounted to a wall or cabinet. Our cabinet we had built in the living room area was perfect to mount these two devices. Inside that cabinet is a 12 volt outlet and a 110 outlet. The amp can be powered by either sources of electricity, but I chose to use a 12 volt receptacle since we're rarely plugged into shore power.
I also had a nice piece of open wall space with nothing behind it to worry about screwing into. I figured since the doors of the cabinet will keep everything out of sight, except for the Trucker Antenna mounted on the front, no one will ever notice any of these electronics.
My two questions I had for the Tech Support were pretty simple, but needed to be answered before I could hook the system up. The 6 Volt connector came out of the box with the wires bare. In the bottom of the box was a small sticker that read POSITIVE, I'm assuming it was supposed to be on one of the wires, but in transit, it had fallen off. One wire had a white stripe on it and the other was all black. I needed to know what wire was Positive so I wouldn't fry the system when I plugged it in. Like I said, these were easy questions. The gentleman I spoke with told me the wire with the White Stripe was the positive side and I had one question down. _________________________________________ *Updated* The salesman from Wilson Electronics contacted me saying that he was sorry and that when I had told him that I was going to be hooking the SOHO Amplifier up to my 12 volt system, he thought I'd be hardwiring the power cord to it. He sent me the power supply with the 12 volt connection already added which did two things.
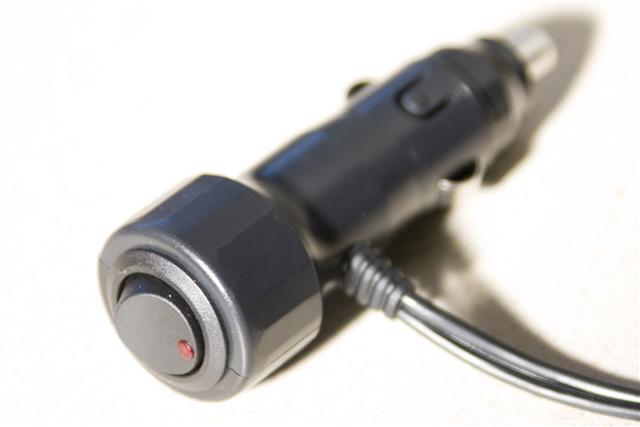
1. Their power supply cord has an On/Off switch right on the 12 volt connector. This is good for when we will be driving all day, the amp wont be drawing any power from the batteries when we aren't using it anyway. 2. I like to have things hooked up the way they are supposed to. Something tells me that their connections are stronger than mine.
So that little bit was just a mix up on my part for not explaining things properly in the first place. If you are ordering a power supply, they have many options for any way you decide to hook it up in your RV/Boat or vehicle, just make sure you give a detailed description before you order. ________________________________________ My next question was whether I could mount the Dual-Band Panel Antenna close to the SOHO Amplifier? If not, I was out of luck because I didn't really have too much room to move stuff around in this small of a camper. Luckily he told me the Inside Panel Antenna and the SOHO Amplifier had no issues with being mounted near each other. I should step back and say that I had already hooked everything up where I thought I was going to install it and plugged it in to make sure I had the Inside Panel Antenna and the Outside Trucker Antenna far enough away from each other so no oscillation would occur.
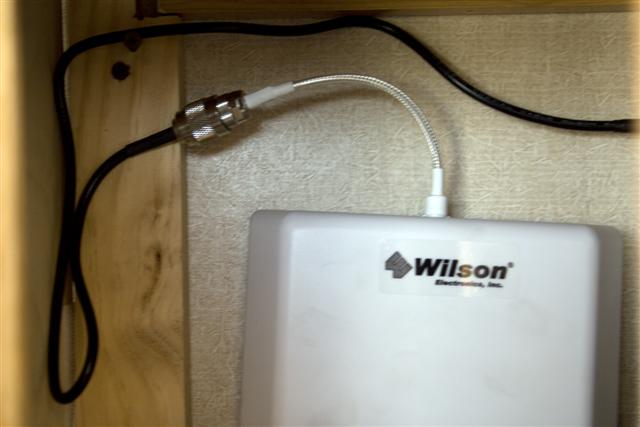
No need in drilling a bunch of holes if the system isn't going to work together. Luckily for me, everything went green on my dry run, so I knew I could start drilling holes for the final install. _________________________________________ *Updated* If you look in that picture, you see a lot of wire beside the Inside Panel Antenna. Again, this was my fault for not telling them that I was planning on mounting everything right together in a small cabinet. So they naturally sent 10' of wire with the amp incase I might need to run a good length of it. When I was talking with the guys from Wilson Electronics about this page, they looked through it and told me that having that much wire bundled together could degrade the signal strength. He actually said "minimizing the cable run will reduce attenuation and you will have better signal, probably about 2.5 dB gain." So when they sent me the right 12 volt connector, they also sent me a 2' cable run which leaves almost no extra cable there. I cant say whether it added a gain right now, because we have a strong signal, but we'll see the next time we get out to the Salt River where we know our signal strength was very low to almost non-existent before we had this set-up.
_________________________________________ Once everything was wired up, we made sure to shut our cell phones off, not that it mattered, they couldn't get a signal in the campground we were staying in anyway, but that's what the directions in the manual called for, so we followed along with their rules.
Mine told me I had 5 missed calls and I kicked myself for not installing this set-up the day we got it in the mail. All of them were family members calling on New Years to give us their blessings. I was eager to power up the laptop to see what our Broadband card would do. We hadn't been able to get a signal for the last four days as far out as we were camping. When the computer booted up, we had a strong signal and emails started streaming in. We were back in business and there was no need to move closer to town to find a campsite where we would be able to update the website. That picture is me all excited now that we're back on-line.....LOL Conclusion Spending a few dollars to keep us connected will save us many dollars in the long run. This week for instance will be a big factor in our wallet. The campground we were staying in, the same one that we couldn't get a signal before we hooked up the Wilson Antenna and amplifier is only $6 a night. The campground we were looking to move to so we could spend a few days to update the website was $31 a night and the cheapest one in this area. If we just wanted to drive into the nearest town to find a wi-fi signal we're talking a 20 minute drive each way. With fuel prices where they are right now, that didn't make too much sense either. It doesn't take a rocket scientist to figure out that we'll pay this investment off in the first month alone. Is this set-up right for everyone? Not if you're just the weekend warrior who only camps a few weekends per year and doesn't really care if you have a cell phone signal or Broadband signal while camping. I fully understand that this is what many of you are getting away from, but for anyone who is spending serious time in their RV and wants to stay connected, then this system is a must have. I think back to all the great campsites we stayed in this past year and begrudgingly left so we could update the website or go make some phone calls. If we would have only found this sooner, I'm sure we would have stayed put longer which in turn would have saved us money. One option is if you only use your camper occasionally, then go with the recommended mount and just route the cable through a window. This will allow you to move the amp and antennas into your house or office to boost your signals while at home. When I was originally talking with the guys from Wilson Electronics trying to figure out which system we should get, they also told me about their portable booster options using a SignalBoost or Dual-Band Mobile Wireless amplifier that can be easily transferred from car or truck to the hotel room or back into the RV or even out on the boat. So really, they have options for everyone, we just decided that since 99% of our work is done in the RV while standing still, lets just hard mount it there and be done with it.
If there is one thing we could recommend
to keep you connected and not worry about the weather conditions or if
you have a clear view of the southern sky, then this is your best bet.
Once you compare the prices of competing systems, you'll know this is
the most inexpensive and best route to go.
Need Unlimited photo storage- FREE Trial of Smugmug
|
||||||
|
|||||||


 After a few phone calls and some emails
deciding what type of system we would need to keep us connected, we
ordered a basic system which included the
After a few phone calls and some emails
deciding what type of system we would need to keep us connected, we
ordered a basic system which included the
 mount
the antenna, but both are on the back of the camper which is where our
living room is also.
mount
the antenna, but both are on the back of the camper which is where our
living room is also. 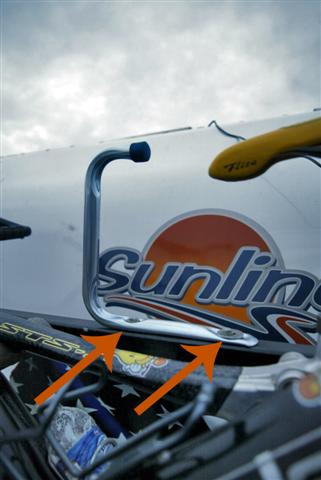 vibrations
and tightened them down snugly. The included mount that came with
the Trucker Antenna looks like it
would grab ahold of any size bar from 3/4" to 2" in diameter.
vibrations
and tightened them down snugly. The included mount that came with
the Trucker Antenna looks like it
would grab ahold of any size bar from 3/4" to 2" in diameter.
 Inside Antenna inside a shelf when you go
camping for the weekend. Then once you head back home, the set-up
could still be used in your house.
Inside Antenna inside a shelf when you go
camping for the weekend. Then once you head back home, the set-up
could still be used in your house. 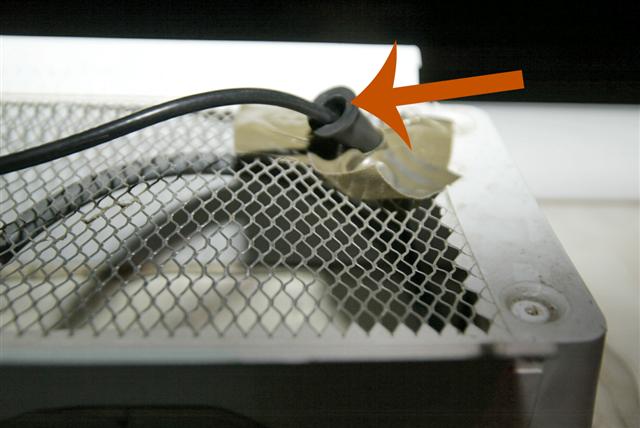 Once the cable was pulled tight from the
bottom, I sealed up the fridge vent with some silicone and crawled off
the roof top. I should also say that I wrapped some duct tape around
the metal vent shield to protect the wiring from rubbing against the
metal. I had also purchased a rubber grommet (red arrow) at Radio Shack that I
slid over the cable and taped in place to act as a shield from the
metal.
Once the cable was pulled tight from the
bottom, I sealed up the fridge vent with some silicone and crawled off
the roof top. I should also say that I wrapped some duct tape around
the metal vent shield to protect the wiring from rubbing against the
metal. I had also purchased a rubber grommet (red arrow) at Radio Shack that I
slid over the cable and taped in place to act as a shield from the
metal.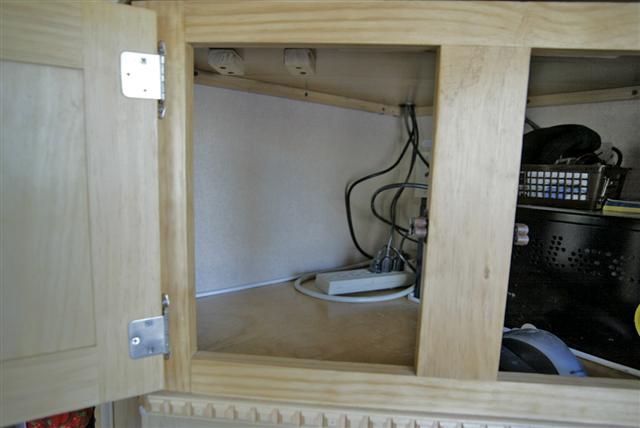
 The 6 volt amp wiring comes from the
factory with the wire ends bare. This is for if you want to hard
wire the connection to its source of power. I stopped at a Radio
Shack and bought a male end of a 12 Volt receptacle to plug into the
wall jack that was right beside the amp.
The 6 volt amp wiring comes from the
factory with the wire ends bare. This is for if you want to hard
wire the connection to its source of power. I stopped at a Radio
Shack and bought a male end of a 12 Volt receptacle to plug into the
wall jack that was right beside the amp.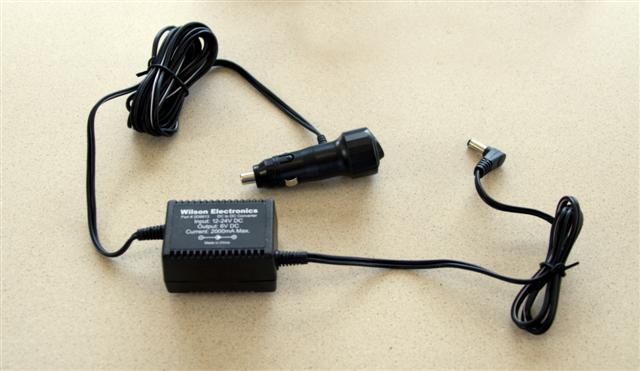
 We
powered up the amp, and got 3 green lights which means we were good to
go. Turning our cells phones back on, both phones went to full
bars and instantly told us we had waiting messages.
We
powered up the amp, and got 3 green lights which means we were good to
go. Turning our cells phones back on, both phones went to full
bars and instantly told us we had waiting messages.